Bedrock Cairn 3D PRO II Adventure Sandals Review

I have been an avid Chaco wearer for years, my first pair has a Made in Colorado tag. Over the last few years I have been exploring minimalist sandals and for about a year now I have been wearing the Cairn 3D PRO II Adventure Sandals. They are not a cheap sandal $140 at the time of writing this, but you do get what you pay for.
About Bedrock Sandals
Bedrock started in 2011 by Nick and Dan as they were working on a river restoration project in Northern California. They were looking for a lightweight, nimble sandal option. In 2016 they launched their flagship design, the Cairn. Bedrock Sandals is now located out of Missoula Montana and are made in the USA.
How I use them

I have been wearing my Bedrock sandals in all weather conditions and seasons. In the colder months I team them up with a pair of Injinji socks.
They were my primary shoes on a 15 day trip across Europe. I use them as a wading shoe for summer fly fishing trips, kayaking trips and paddle boarding trips. They are my favorite shoes for photography/hiking trips.
Sizing
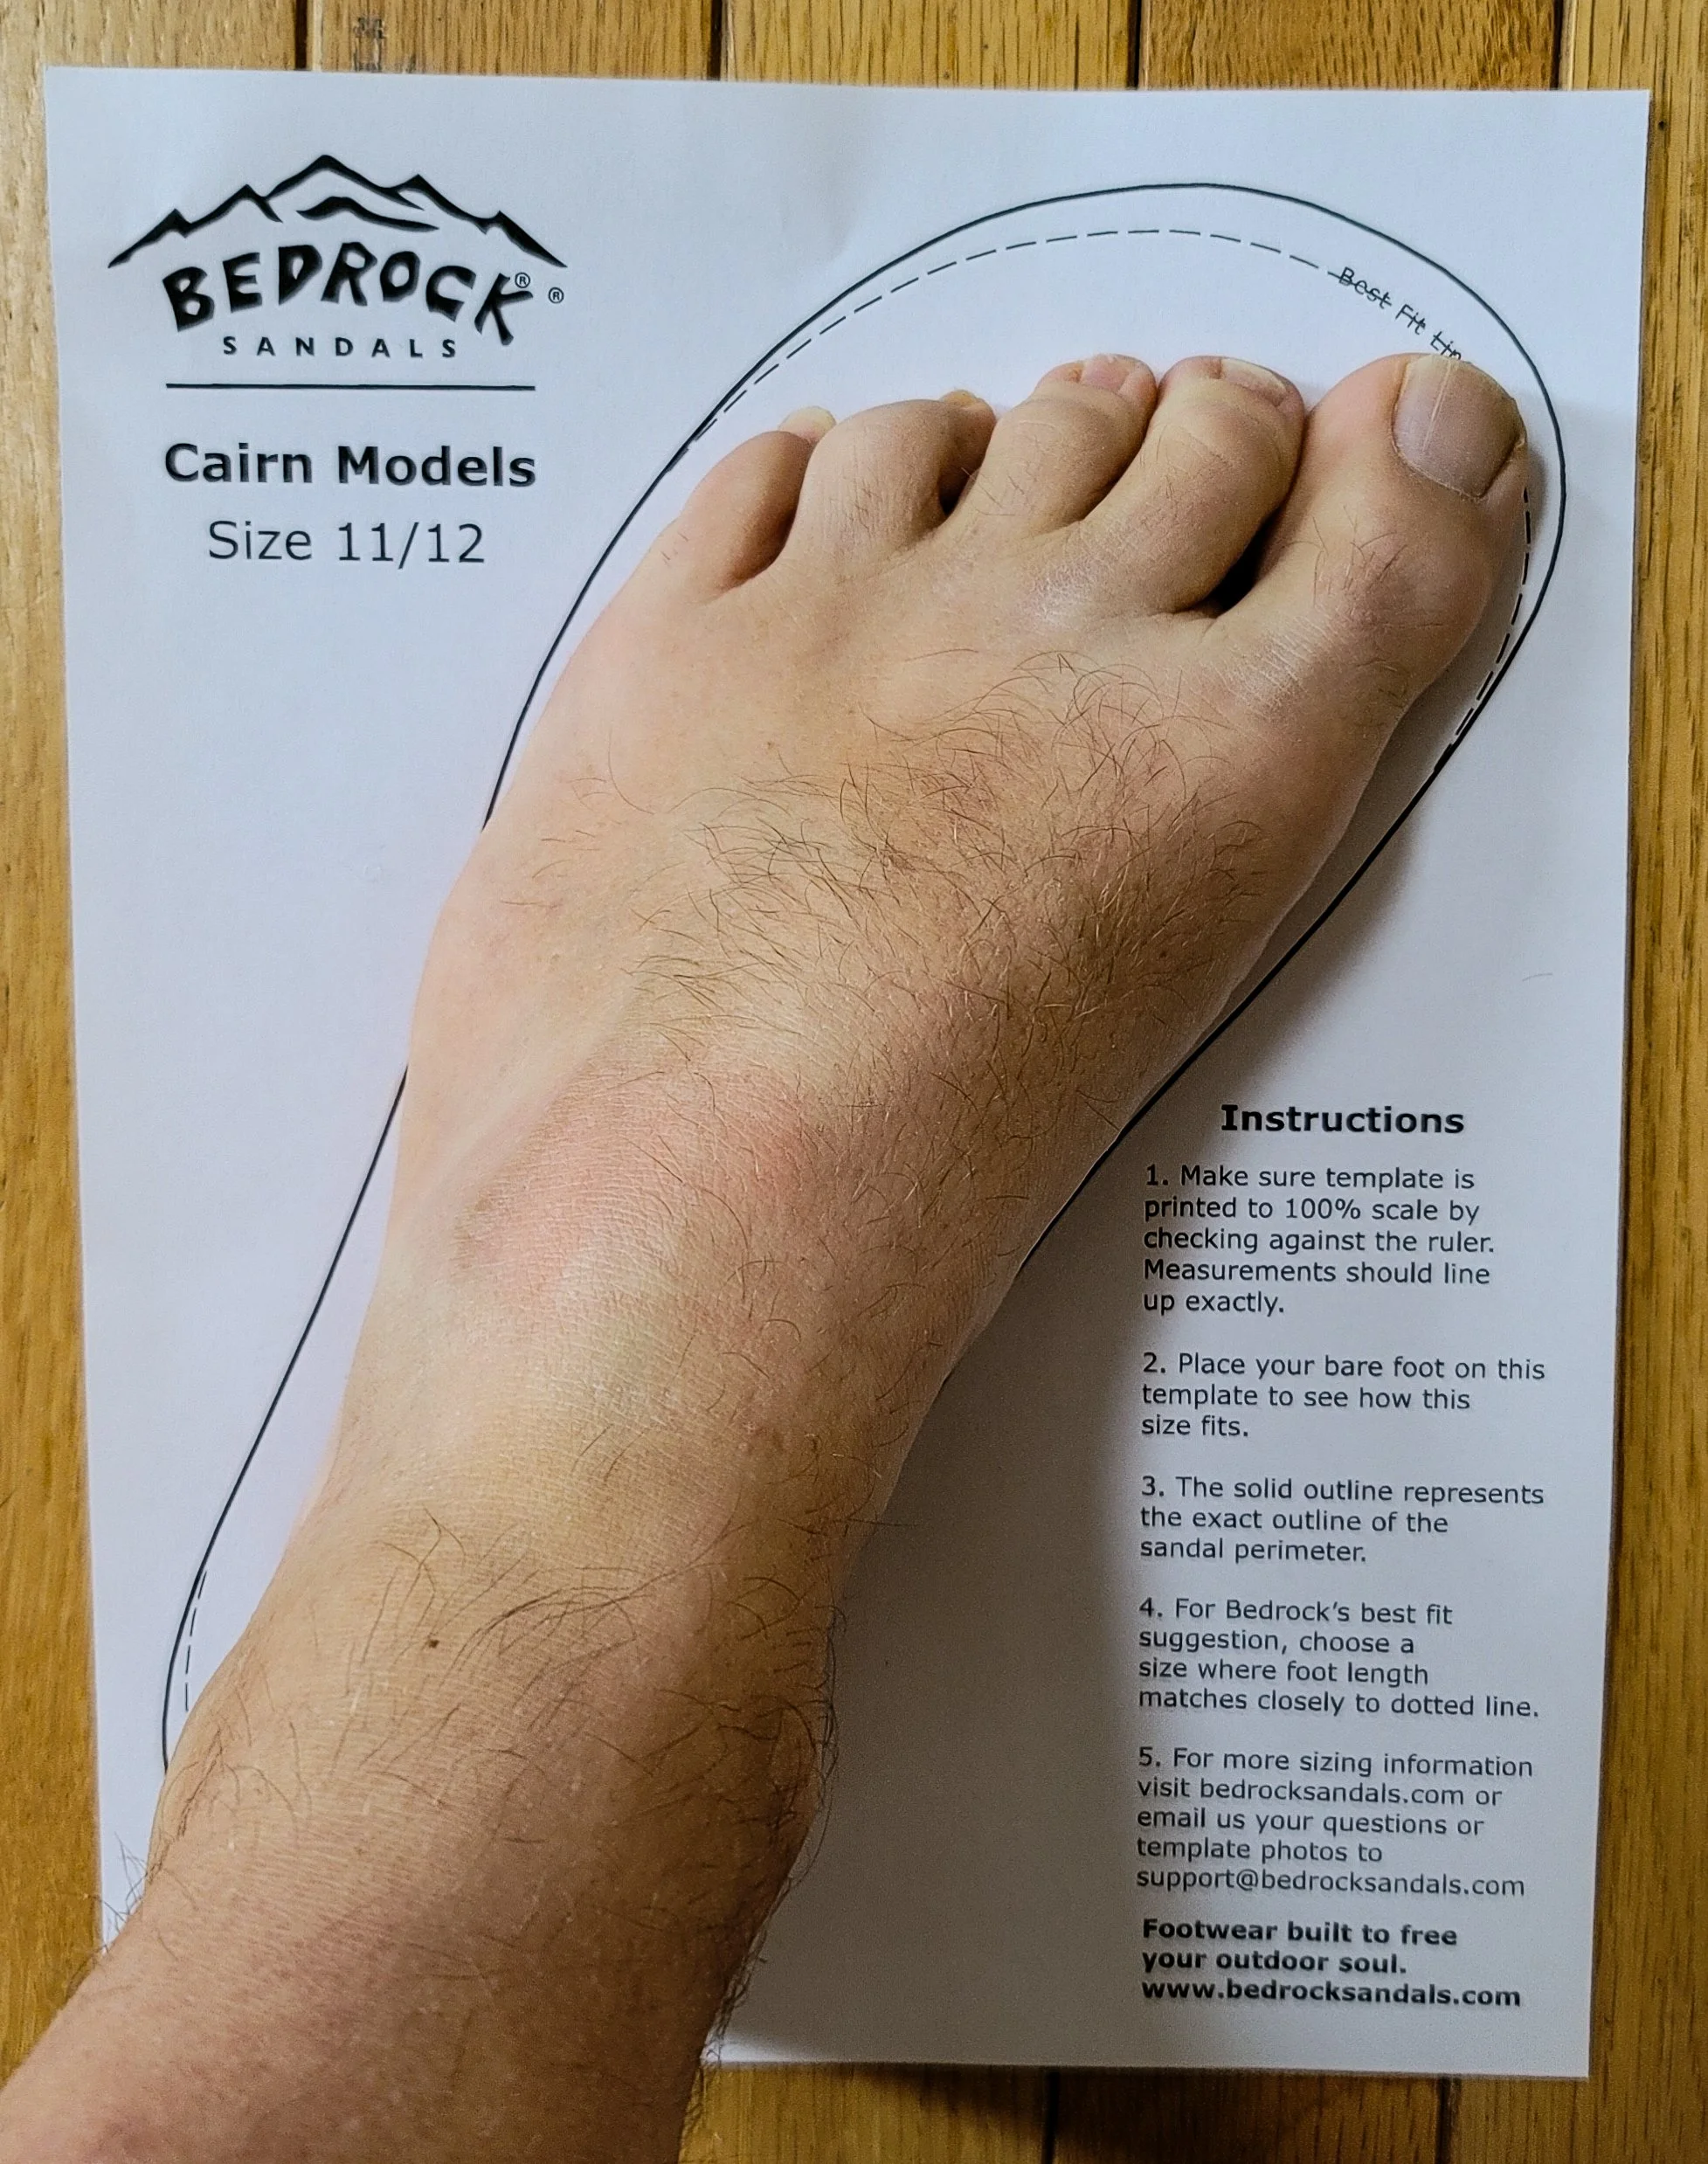
Bedrock has made it very easy to find your size. Download and print your size from their sizing chart to confirm the fit and if you are still not sure, you can send them a pic of your foot on the guide and they will give you some advice. If you do print the guide, I am a men's 10.5 and I found the mens 11 fits me perfectly with room for adjustment.
Fit/Look
The Cairn 3D PRO II Adventure Sandals have 3 adjustment points. Two of them use a metal hook and daisy chain system to give you a secure adjustment. Once you have then adjusted, I find I have no need to change these adjustments. I like that there are no velcro straps that I need to worry about in fast moving water.
They have a very distinctive look with the use of webbing straps and metal attachments give them a very utilitarian look. This look will not work for everyone. The Cairn 3D Pro is made with all vegan materials.
Traction

The Cairn 3D PRO II Adventure Sandals are made with exclusive REGOLITH Bedrock x Vibram® sole. The sole gives the Cairn 3D Pro II superior traction on both wet and dry surfaces. Hiking in New Jersey around waterfalls, I find myself on wet, rocky, slippery surfaces and I have not found myself feeling unstable.
Bedrock sandals are made to be resoled. At the time of writing this, the cost is $55. You can find out more here, Bedrock Sandals Resole Program
Comfort
The Cairn 3D PRO II Adventure Sandals have a sole that is thick enough to protect your foot but you can still feel the ground under foot. This is important when you are on rocky terrain. Once you get them fitted to your foot, I have not had any issues with rubbing or hot spots. The use of the round cord between your toes is a nice feature compared to other sandals that use a flat strap.
Final Steps
Bedrock Sandals are not cheap but you get what you pay for. If you are looking for a lightweight sandal I highly recommend them. They can take anything you can throw at them and if you team them up with a pair of Injinji socks you can extend their wearing season.
Let me know if you wear Bedrock sandals and your thoughts.
Advance Mobile Travel Photo Kit
“The best camera is the one that's with you,”
- Chase Jarvis-

After taking these factors into consideration, I decided I was only going to bring a small mobile photography kit focused around my Samsung Note 20 Ultra. You can find everything here in my Amazon Store.
The first piece of equipment is a small tripod with a ball head. I like the GorillaPod made by Joby. The one I use is the Joby Gorillapod 5K Kit with Rig Upgrade. This kit has sturdy legs and it includes a stable ball head as well as two accessory arms to hold lights or a mic for video.
To hold the phone on the tripod, I use the Joby GripTight Pro 2 Mount. This mount gives you the option to take both vertical and horizontal photos. The mount also has a cold shoe for you to mount a microphone or external light for when you are shooting video.
To give yourself a wider range of focal lengths, invest in lenses that are made to connect onto your phone. I am a fan of the system made by Moment. They make quality lenses and other attachments that connect right to your phone. To use these attachments you will need to have a case on your phone from Moment that accepts the attachments.

The first Moment attachment I recommend is the Moment Phone Filter Mount. This allows you to attach 37mm filters right to your phone. Filters are a simple and effective way to advance your photography. Two filters that I always have with me are the K&F Concept 37mm Circular Polarizer and the K&F Concept 37mm adjustable ND filter. The filter mount and the polarizer filter and ND filter are always with me. These two filters alone will help you bring your mobile photography to the next level.
The second Moment attachment are their lenses. Moment makes high quality lenses that attach right onto their cases. I have used other clip-on lenses and I have found the Moment lenses to have the best quality. They act more like a pro SLR lens. The Moment lens also works great for shooting video.
Here are the three lenses:
Some additional accessories you might want to bring:
External Microphone- I like the Rode VideoMicro Compact On-Camera Microphone with Rycote Lyre Shock Mount, the mic does use a 3.5mm jack to connect, make sure you have the adaptor required for your phone.
External Light- The JOBY Beamo, Mini LED Light is made to attach right onto the Joby Gorillapod 5K Kit with Rig Upgrade tripod. The tripod can hold up to two accessories. With the light I would also have the JOBY Beamo Mini Silicone Diffuser.
To hold everything I use a Tenba Tools Tool Box 6. This case is compact to fit into a carry on but has enough space for all of my gear. I will also carry all of my required charging cables in the case as well.
The last piece of equipment is a bag to carry everything in. I am out just shooting with my mobile kit, I use one of two bags. I am not going to go into too much detail as I will be doing an in depth review of both.
The first one is a traditional camera backpack, the Tenba Shootout Slim. This is a 14L backpack with equipment dividers for you to customize the setup. My top feature is as a back panel opener so when you lay it down to get your gear, the shoulder straps are not down in the dirt.
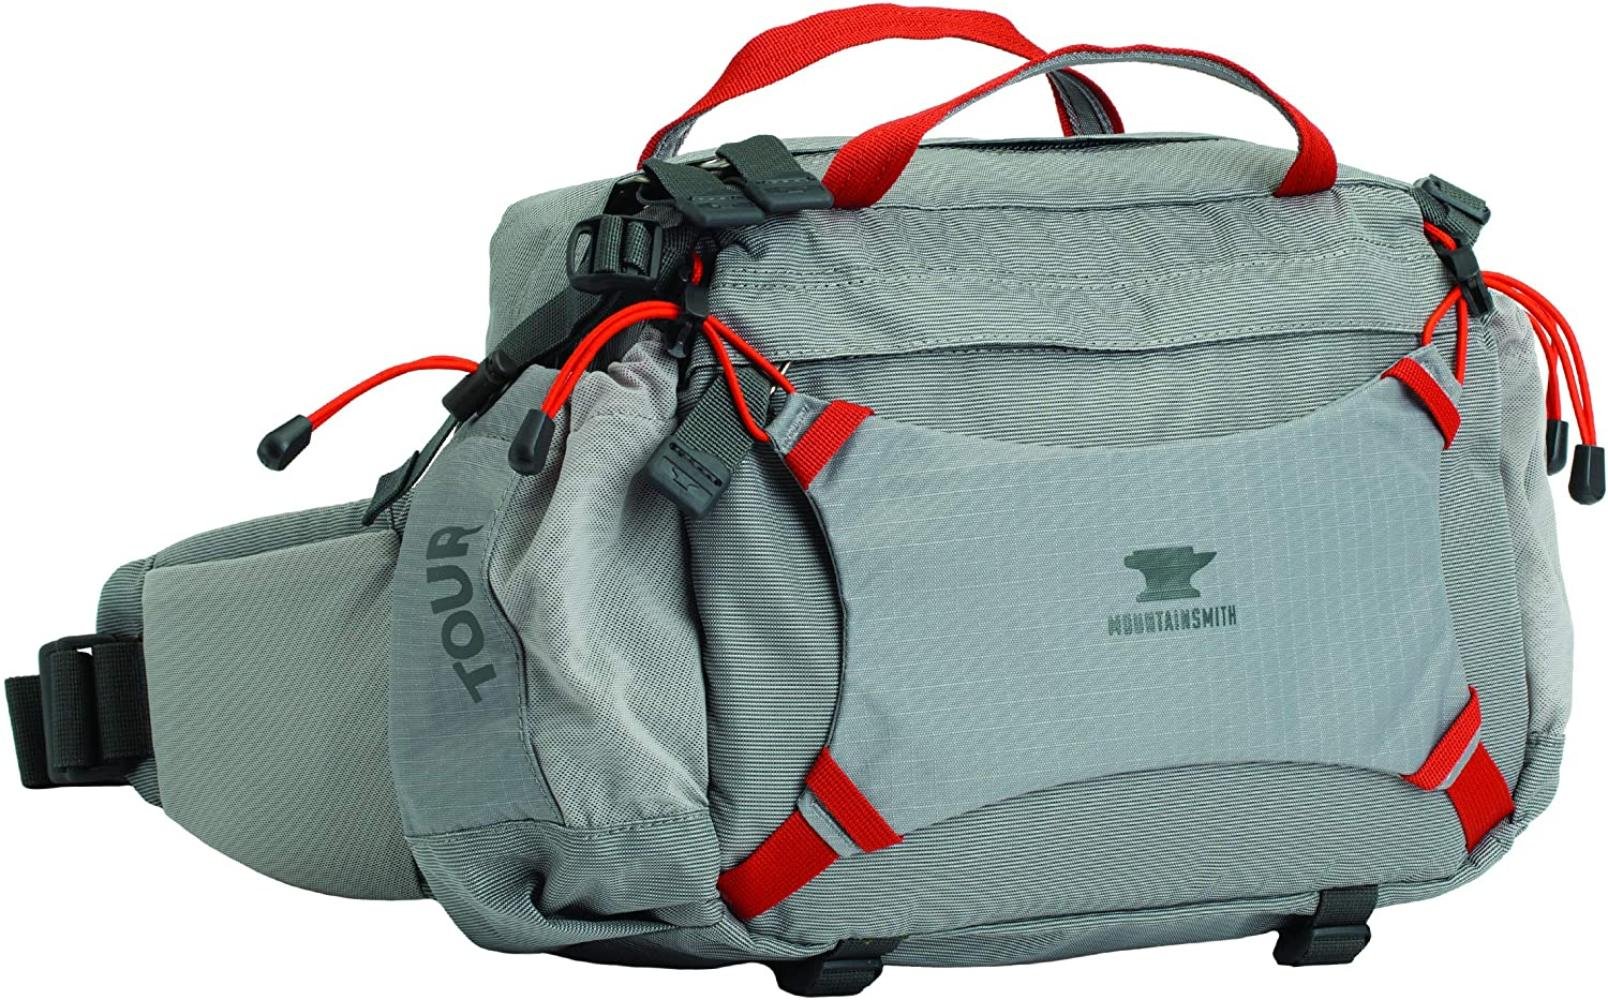
My second bag is the Mountainsmith Tour Lumbar Pack. This is a lumbar pack so all of the weight sits on your lower back and your hips. This takes the weight off of your shoulders. I will do a full review of this bag in the future.
Basic Mobile Photography Kit

I just had the pleasure of spending 15 days traveling through Europe. When I was packing, I had to make a decision on my camera gear, what to bring and how much of it I wanted to carry. The other factor I had to take into consideration was the weight restrictions and number of bags you are allowed to carry onto airlines.
After taking these factors into consideration, I decided I was only going to bring a small mobile photography kit focused around my Samsung Note 20 Ultra. You can find everything here in my Amazon Store.
The first piece of equipment is a small tripod with a ball head. I like the GorillaPod made by Joby. The one I use is the GorillaPod 3K Flexible Mini-Tripod with the Joby BallHead 3K. This combination is lightweight and compact but it still gives you a sturdy platform to mount your phone to.
With the tripod, you need a phone mount. For my basic setup, I use the Joby GripTight ONE Mount. This mount is small in size and does not take up a lot of space. Note that it will only hold the camera in a horizontal format. I use this mount if I will only be shooting in a square format or if space and weight is extremely limited.

The only additional accessory I will always carry is a ND (Neutral Density) filter. A ND filter will reduce the amount of light coming in through the lens. This will give you the ability to use a slower shutter speed allowing you to add motion to water. The nd filter will also give you a more uniform exposure between highlights and shadows.
I carry the Cokin Square Filter Full ND Creative Kit. This kit gives you 3 ND filters to pick from, depending on how much light you want to reduce your exposure by. To use the filter, I will have the phone on the tripod and I will just hold it in front of the lens. ITs simple, but it works.
The last piece to my basic kit is a case to hold everything. For this I use a Tenba Tools Tool Box 6. This case is compact to fit into a carry on but has enough space for all of my gear. I will also carry all of my required charging cables in the case as well.
If you are looking for a more advanced mobile photography kit or are planning on shooting more video, watch out for my Advance Mobile Photography Kit post.
The Darker Side of Round Valley Reservoir

As most of you might know, I love Round Valley Reservoir located in Hunterdon County NJ. Since I posted my last blog post about the park, I have researched the construction of the reservoir. I found a great movie called The Town that Disappeared Overnight. The movie looks at the rescue from the perspective of the townspeople who lived in the valley.
Along with learning about the construction history of Round Valley, I also discovered the reservoir has the name nickname of the New Jersey Bermuda Triangle. This is due to the number of swimmers and boaters who have gone missing over the years and the many accounts of boaters and swimmers seeing things in the water. If you would like to learn more about the swimmers who have gone missing, here is a great article called New Jersey Has Its Own Bermuda Triangle... And Its’ Eerie Beautiful.
Both of these links are extremely interesting. The movie has made me look at the lake from a different perspective, but I am not going to stop enjoying the resources the park has to offer.
Removing Trail Graffiti

Over the past year, the number of people taking to the outdoors for enjoyment has increased. Along with the number of people heading out to our parks for enjoyment, the number of people going out for negative reasons has increased as well.
In January of 2019, the U.S. Government experienced a shutdown, and during this time our parks were heavily destroyed by people leaving behind trash and graffiti. The Washington Post has a great article about the effects in Joshua Tree National Park.
Graffiti is not only an issue in your larger, well-known national parks. It has also become an issue in our smaller, lesser-known National Parks and State Parks. I have been spending time exploring my local parks and it hurts me to see a waterfall covered in green moss and orange spray paint.
The New York-New Jersey Trail Conference (NYNJTC) published an article about how you can remove graffiti from rocks in your local parks.

I would recommend you take a look at the article but here are a few important points
Always document the location. Record the trail, where on the trail. If you have a GPS record the coordinates.
Take photos of the graffiti to document it. The Trail conference recommends you use the Avenza Map App. It is a free app.
Work quickly to remove the issue. It does not only effect the experience of hikers, other people might see it and be encouraged to do the same.
Always try to remove the graffiti first, before you try to cover it up.
Before you go to remove the graffiti, always check to make sure it is ok that you do so with the owner of the land, especially if you are in a state or federal park.
If you would like to help remove graffiti or if you have seen some on your favorite trail and would like to remove it, I put together a list of the tools and safety gear you will need to get started Click Here. If you do come across graffiti on a trail but do feel comfortable cleaning it, report it to who over sees the park or reach out to your local outdoor club. If you are not sure who to reach out to, send me an email with the location and photos, I will find out who to report it to.
Lastly, Get involved with the New York New Jersey Trail Conference or your local outdoor club. Most trails are maintained by these volunteer organizations.

Know Where You Are Going: How to Read Trail Markers

A few weeks ago, I went for a hike at the Delaware Water Gap National Recreational area. It was a beautiful day and I was expecting the park to be busier then it was. The trail that I was hiking was not long, about 1.5 miles when you would hit a junction with another trail that would lead you to the Appalachian Trail. It was not until I was just below the junction that I encountered my first fellow hikers.
The first couple that I passed were heading down the trail I just came up. I stepped off the trail to let them pass and they came across as experienced hikers. We said “hi” to each other and went on our ways. When I reached the top of the trail, I sat on a stump drinking some water when a woman with her child came up one of the other trails. They stopped and the woman pulled out her phone, I assume she was using her phone to navigate. Watching her, I can tell she could not get a signal, and she and her daughter kept looking at the different trails and spinning in circles. I asked them what trail they were looking for but got no response. At that point I was getting ready to head back down to my car, I quickly told them where the different trails headed to and set off.
As I started down the trail to the parking area, I quickly came upon the first couple that I passed. They were standing in the middle of the trail looking at their phone, from what I can tell, not having any success getting a signal. I asked where they were headed and all they responded with was, “ back to our car”. I told them where the trail we were on headed to and passed them. When I got back to my car, I was the only vehicle in the parking lot.
As I started to head out of the park, I started to think about both groups and how they were both relying on technology to navigate.
After being stuck at home for 3 months, more and more people are venturing out to our national parks and state parks. Hiking is a great way to see and to connect with nature but we need to be safe and smart about it. One of the most important skills is knowing how to navigate trails and how to understand the information you get from trail markers.
When it comes to trail markers, there are 6 common types, of these from my personal experience, 3 are very common. Here is the list of all 6 in the order that I have experienced.
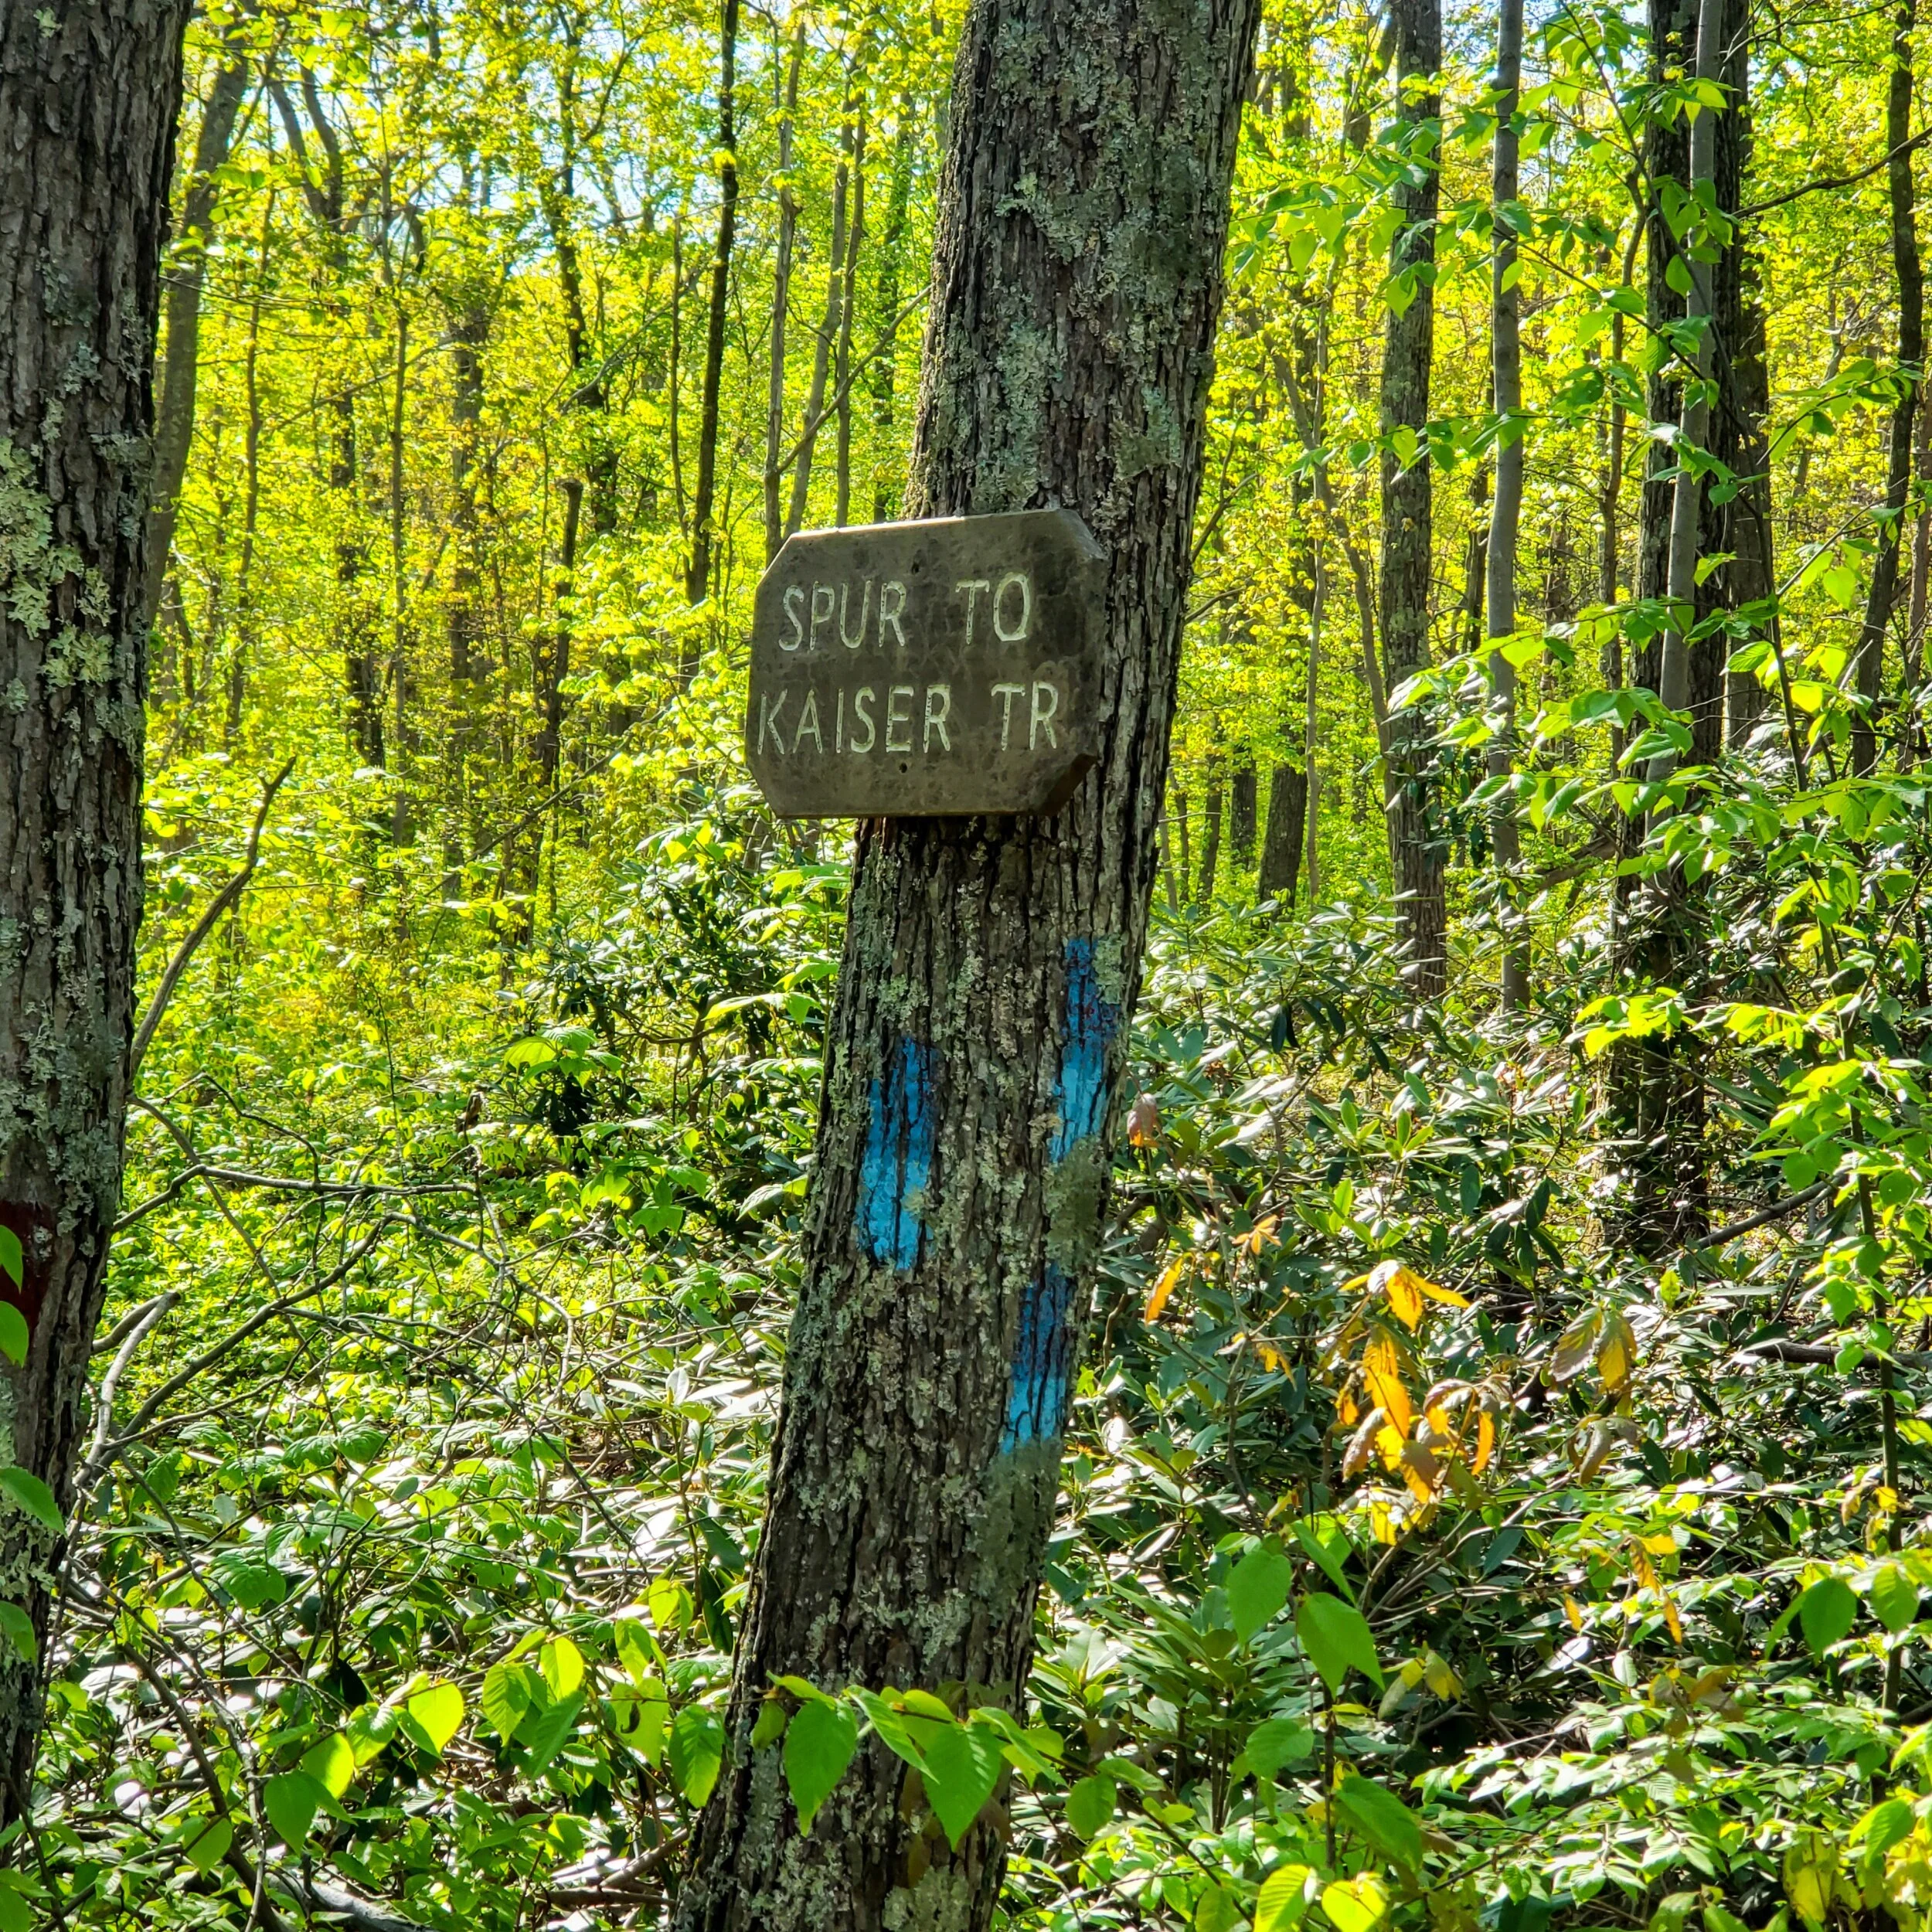
An example of both paint trail marker and a wood sign mounted to a tree.
Paint- I will say on the east coast paint is the most common. You will see them in everything from a town park up to our national parks. Placement of paint trail markers tends to be on a natural object like rocks and trees and is almost always in the shape of a simple rectangle.
Posts- These are wood signs that are engraved with important information. You tend to see them at trailheads and other key points along the trail. Some trails will also use posts as mile markers along the trails. If you have a good set of trail maps, some posts markers will be noted on the maps. This can give you an accurate location.
Markers- Markers are affixed signs that will be mounted to trees and other natural elements on the trail. They tend to be made out of plastic or metal. You tend to see markers on trails that have a name like the Patriots Path and northern NJ.

This is a example of a Marker trail marker. A plastic tag nailed to a tree.
Now we are getting into the less common trail markers
Flags- Flags will be marker tape that is tied around trees and other objects. I have only ever seen flags on a new trail that has not had the final markers attached. In areas that are open to hunting, I have seen flags that hunters use to mark the path to their hunting stands.
Etching- Etching is when the trail marker is etched into a tree. I personally have never seen this marker used.
Cairns- These are stacks of rocks that will stand out against the landscape. This is another type of trail maker I have never seen used.
You will find that most trail will use a combination of these markers. The two most common, paint and post will give you the most information. Posts are very clear and easy to understand as all of the information is engraved into the wood.
Paint markers have their own language, it is not hard to understand but you do need to be a little more observant to the markers. Observing the placement and color of the rectangles will tell you where to go as well as where you are.
The first part is to understand the color or blaze that represents the different trails. One of the most famous is the Appalachian Trail (AT) which is always a simple white rectangle. When you are hiking in the Delaware Water Gap on the Mt. Tammany trail, you will see a white rectangle with a red dot in the center, this is known as the red dot trail. Both the AT and Mt. Tammany trail passes through the same parking lot so it is important to know the difference and what color represents your trail. I have been on the red dot trail and ran into hikers who thought they were on the AT.
Knowing what color marker to look for will help guide you, but now you need to know what the different marker configurations mean.

Trailhead or Start of the trail

Trails End

Stright

Turn Right

Turn Left
Intersection
Along with having an understanding of trail markers, there are a few other steps you can take to keep on track.
Get a set of quality trail maps that are up to date. If you are in the New York Tri-State area, the New York/ New Jersey Trail Conference is a great resource for maps and other trail information. Most parks will have a basic trail map available at the park office or at the trailhead. These maps tend to be extremely simple and basic. If you are going to use your phone to navigate, make sure you download the maps to your phone. In a lot of backcountry areas, you will not have cell phone reception. The Delaware Water Gap is located under 2 hours from New York City and in most of the park cell phones will not work.
Be sure you know what the markers look like for the trail you are hiking. I have seen trails where two trails come together so a tree might have a blue and red marker located on it. Be aware of this and if you come across this be extra aware of sighting markers.
I always look well ahead for the next marker so I have an idea as to where I am going. This is very important on trails that are not very clear in the landscape. One example is the red and white trail in the Delaware Water Gap. The trail goes through a very large boulder field and without the trail markers it is easy to get lost.
Markers are not always on trees, they can be a self-standing post, painted on rocks on the ground, or even attached to road signs at road crossings. Be aware and look around.
The last tip and sometimes this is very hard to do is if you have not seen a marker in a while, stop. Turn around and see if you see any markers for your trail going the other way. If you don’t, backtrack a little until you do come across a trail marker.
I love it when people get out to explore and to enjoy nature but we need to be safe about it. I have spent over 20 years working in the outdoor industry as an outfitter and as a guide. If you have any questions please reach out to me.
Added Note 10/13/2020
As I was looking at a trail map for a local State Park (Hacklebarney State Park) I was happy to see in the bottom right corner of the map, is a key to how to read trail markers.
NJ State Park Series: Round Valley Recreation Area

This is the first part of a series that will pay homage to the beautiful state parks of New Jersey. The parks I will be profiling are just a small part of the more than 80 plus sites that make up the NJ State Parks System.
The New Jersey State Parks system was founded in 1923 and today consists of 89 locations across the state, this is made up of a range of state parks (30), state forest (11), recreation areas (5), state marinas (5), and historical sites (38). The smallest state park is Barnegat Lighthouse State Park (23 acres) that includes the historical Barnegat Lighthouse, also known as Old Barney. If you drive west from Old Barney, you will shortly hit the largest state forest in NJ Wharton State Forest (115,000 acres). Wharton State Forest also includes one of the most unique habitats, the historical Pine Lands also known as the Pine Barrens. This area of NJ is said to be the home of the famous Jersey Devil.

Round Valley Recreation Area in Hunterdon County is one of my favorite sites in New Jersey. Round Valley was founded in 1960 when the water authority dammed off the valley to create a reservoir to supply water for central New Jersey. When you first approach the reservoir, the first thing that hits you is its size. The reservoir reaches 180 feet deep and contains 55 billion gallons of water when it is full. The reservoir is filled by water from the South Branch of the Raritan River. The reservoir is open to boating and fishing as well as kayaking and paddleboarding.

Although the reservoir may look serene and unintimidating, please be careful when you are on the water and follow all required life jacket laws. I have been out on Round Valley kayaking and have experienced white caps. It is important that you keep an eye out for the wind warning lights. The water is cold and deep and can be dangerous. In Mid-August, if you submerge below 6-8 feet, the water temperature drops quickly. Once boatside, on a sunny day you can see down to 20 feet plus.
Amazing sights and views are not only below the water at Round Valley, they can also be above your head. The last time I was on the water, I had the pleasure of watching a bald eagle hunt for fish. The park also has a network or trails that are open to hiking, trail running and mountain biking. You can also use the trails to access the wilderness campsites. Other than backpacking, the only other way to access the campsite is from the water.

Round Valley is the first NJ State Park I started to explore as a child. This park is where I began to learn about the park system and it instilled in me a love for our parks. If you are looking for a great place to spend the day that is not too difficult to access, Round Valley is a great place to visit for the whole family.
Website: Round Valley Recreation Area
Where do I Purchase Used Camera Gear
Photography can quickly become an expensive creative outlet. One way to keep the cost down is by purchasing used camera gear. As with anything used, you need to make sure you are going to a dealer who you trust and will return the gear if needed. As I have been getting back into shooting film, I have been finding myself looking at and purchasing more used camera gear. I have looked at a lot of different used equipment dealers and here is a list of dealers I personally use.

1. KEH.com- I buy most of my used medium format gear from KEH. They have very fair pricing and they grade the equipment very well. They are one dealer I do not shy away from bargain. I have found there bargain level is equal to some mid levels from other dealers. I also like that on used equipment they also give you a 14 day return policy. KEH is my first place.

2. B&H- I am sure everyone knows of B&H in New York. I buy most of my new equipment as well as some used from B&H. I love going to the store and getting lost in the used department. B&H like KEH does allow you to return used gear if you are not happy with it. They offer a 30 day return.
3. Ebay and Craigslist- These are to outlets I have not purchased and camera gear from but I do know a lot of photographers who have. On Ebay you want to make sure you are purchasing from a seller who has a strong rating. As I have been shooting more medium format and looking at large format, I found myself watching listings on Ebay more but I still have not purchased anything.
As for Craigslist, you need to be careful. I have sold gear in the past and I always made sure I would meet the buyer at a very public location. I know most towns where I live, the police departments have parking spaces in front of the station for this use. I have never purchased any camera gear on Craigslist and find myself steering away from it.
4. Facebook group Used Camera & Photography Gear for Sale- There are a lot of Facebook groups for buying and selling camera gear. I do belong to a few and I have sold some old lenses this way. My experience I have found everyone is very honest and you can get some great deals.
I hope this helps if you are in the market for used gear. As I find new dealers I will be sure to let you know. Also please let me know if you have any questions or comments as to where you get used equipment.
What to do with your negatives.

Now that you processed your back and what film, what do you do next? You have a few options, take them to a traditional photographic darkroom, scan them yourself at home, or send them out to a lab to have scans made.
The first option and I feel the most romantic but it is also the most expensive and requires the most equipment. If you have ever spent any time in a darkroom, you how long it can take to make one print. Once you have that print produced, you will then still need to scan if you want to share it digitally. If you ever have the chance to work in a darkroom, jump on it, it will give you a new appreciation for Photoshop.
An easier way to go is to scan your negatives into digital files at home. The price of a good flatbed scanner will start around $500 up. With a flatbed scanner you will be scanning one frame at a time, this can be a time consuming process. A great tutorial to watch on how to scan negatives on a flatbed scanner is by Nick Carver.
Right now I can’t justify the purchase of a film scanner. I send my negatives out to a professional lab to have them scanned and sent back on a jump drive. Below is a list of labs that I have found that scan film. While most labs will scan black and white film, check with them first as some will only scan color film that they process.
North Coast Photographic Services
Millers Professional Imaging For professional photographers only
If you live in NJ, The Photo Center in Brick NJ does film scanning. If you know of a different lab that you use, please leave a comment and let everyone know.
When you send your film to the lab do not cut it, leave it as a full film strip, this will save you some money. Most labs will charge extra if the negatives are cut as it is a slower process.
After I get my negatives back from scanning, I store them in Archival Storage Pages, this keeps the protected and helps organize them. I then keep the pages in an Archival Binder, you can use a standard 3 ring binder but the archival binder helps to keep dust out.
Film photography is a lot of fun. I find myself slowing down when I am shooting as i keep in mind I am limited to the number of frames I have. It also forces you to hone your photography skills as there is no preview on the back of your camera. Pick up an old film camera and a few rolls of film give it a try.
At Home Black and White Film Processing

One of the many things I love about black and white film is that you can process (develop) the film at home in your kitchen or anywhere you have access to a sink. The following steps detail the way I process my film, I find that this system works well. If you research a bit more on the internet, you will find there are additional steps and chemicals you can add or remove depending on the look you want to achieve. What I like about this system is it keeps my chemical use to a minimum and the supplies do not require a lot of storage space nor are they overly expensive.
Here is my equipment and chemical list. The initial cost is around $200 not including film. You can find everything you need at B&H Photo as well as most of it on Amazon.
Equipment
Paterson Changing Bag Use this to load the film into the processing tank if you do not have access to a photography darkroom.
Paterson Universal Tank with Two Reels Light tight film processing tank
Delta 1 6" Precision Darkroom Thermometer Temperature is extremely important for developer time.
Delta 1 Datatainer Chemical Storage Bottle These containers are made to store photographic chemicals and to keep light out. You need one for developer and one fixer.
Chemicals
Developer- Kodak D-76. It is a powder- one container makes 1 gal.
Fixer- Photographers' Formulary TF-4 Archival Rapid Fix - one container makes 1 gal.
Kodak Photo-Flo it helps to speed up drying and cuts down on water spots.
To time everything I use an app called The Massive Dev Chart.(Android and IOS) It is not a free app but it is well worth the cost because one of the trickiest aspects of processing your own film is timing. Simply select your film and developer type from the scroll down menu and it tells you the processing time. It gives you general timing for stop bath, fixer, and final wash but you can customize the settings. For the fixer, check the instructions on the back of the bottle for the timing.
Process

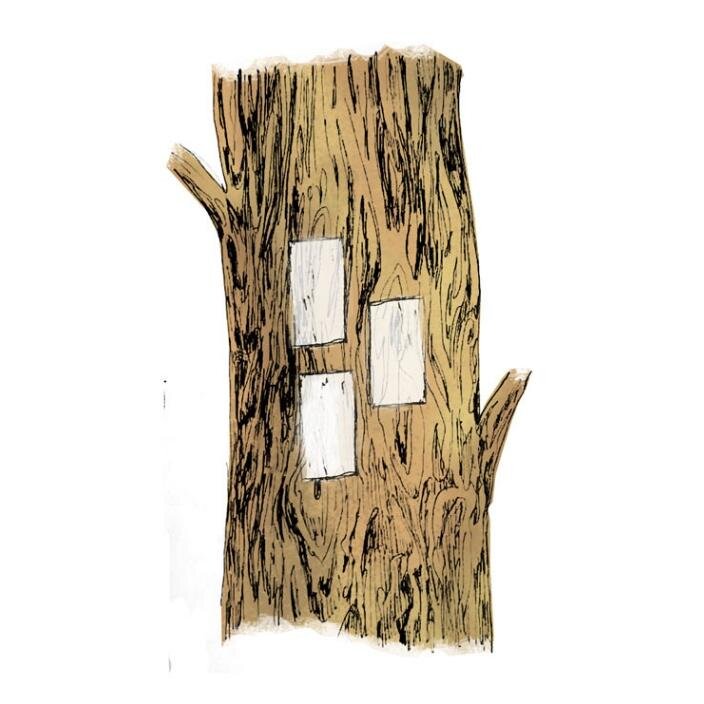
Image 1: Agitation
Load the film onto the reel in the changing bag
Pre rinse the film for 1 min in running water
Develop with developer. I use Kodak D-76, the time and temp depends on the film.
Agitate (See Image 1) for the first min and then 5-6 times every 30 sec. When done after each agitation session, give the tank a little knock to release any air bubbles.
Stop Bath for 1 min in running water
Fixer for 4 min
Agitate for the first min and then 5-6 times every 30 sec. When done after each agitation session, give the tank a little knock to release any air bubbles.
Finial rinse 10 min in running water. It is now safe to open the film tank.
Photo Flo 30 sec.
Agitate by dunking the film reel in and out of the fluid 5-6 times.
Hang to dry. If you decide to use a squeegee do it very light.
Black and White Film Developing Tips
1. The best way to open a 35mm film can is with a bottle opener. Open it on the end without the spool sticking out. Again this need to be done in a changing bag or a photography darkroom. Loading the film on the spool is the hardest part, I highly recommend you destroy a roll of unexposed film and practice outside of the bag first, so you can master the process and see how it works before trying it blind.
2. The film tank Paterson Universal tank comes with 2 reels and can process, two 35mm rolls at one time or one of 120 film or 220 film at a time. The bottom of the tank will tell you how much chemicals you need depending on what your processing.
At home film processing is fun and very easy to do after you get the hang of it. I hope this post helps you get started, if you have any questions, please don’t hesitate to ask!